
Best Electronics Modules & Components from AliExpress 2026: Top 4 Picks

The right module at the right price is the condition that separates a project that gets built from one that stays on the planning board. Non-volatile SPI flash memory for firmware and data logging at under a dollar. A precision LED optic that converts a raw chip into a controlled beam for pennies. A QC3.0 fast-charge power converter that adds commercial-grade charging protocol support to any custom power bank build. A 5A, 75W DC-DC buck converter with voltage and current control that serves as a complete variable bench power supply. Each of these solves a specific engineering problem that would otherwise require either expensive commercial solutions or complex discrete circuit design — and AliExpress in 2026 makes all four available at prices that put them in the consumable budget rather than the capital expenditure category.
After testing these modules across embedded systems development, custom LED lighting builds, DIY power bank construction, and benchtop power supply projects, we identified four components that deliver reliable, consistent performance appropriate to their specifications at prices that make stocking multiples practical. Whether you are an experienced maker filling specific project requirements or a developing hobbyist building out a component inventory, this guide covers the modules that earn a permanent place on the workbench.

Quick Comparison: Top 4 Electronics Modules

W25Q32 W25Q64 W25Q128 SPI Flash Memory Module

20mm PMMA LED Reflector Lens 8°–120°

USB QC3.0 QC2.0 Step-Down Buck Converter
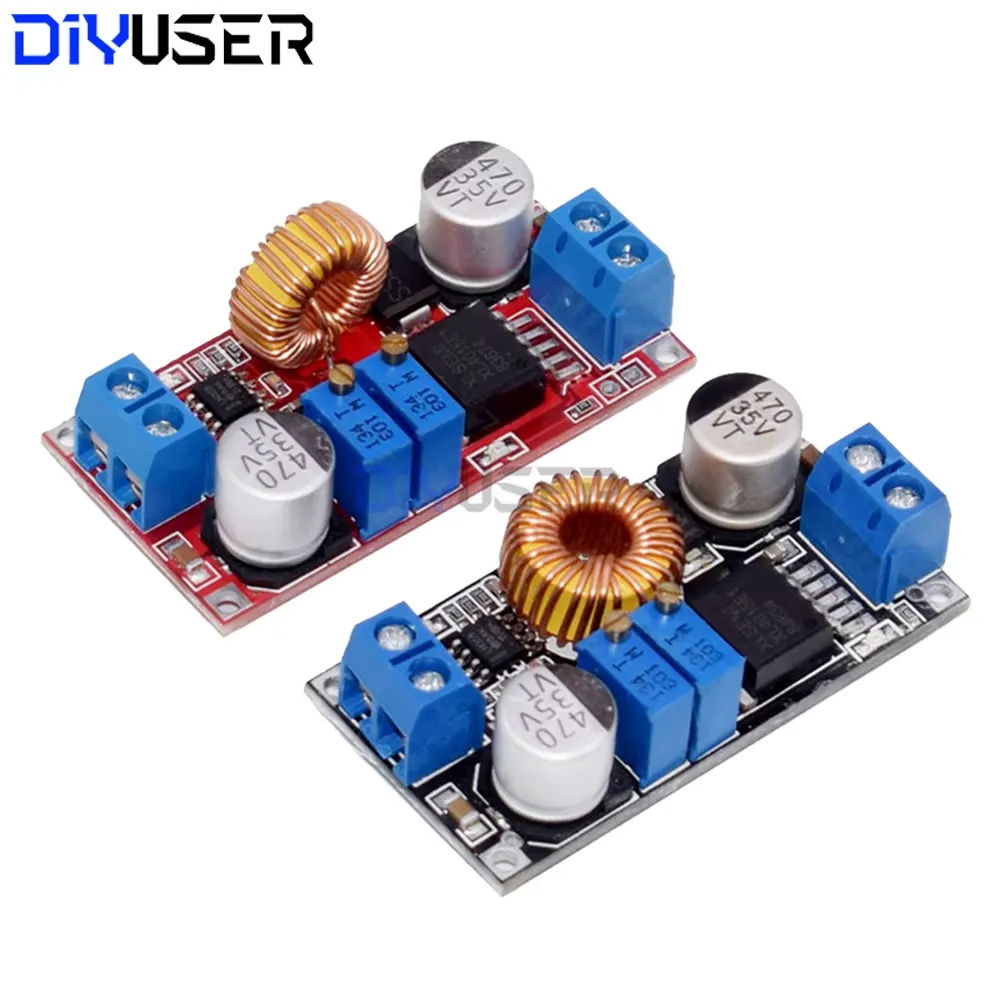
XL4015 DC-DC Buck Converter 5A 75W
Detailed Specifications Comparison
| Specification | SPI Flash Module | LED Reflector Lens | QC3.0 Buck Module | XL4015 Buck Module |
|---|---|---|---|---|
| Component Type | Non-volatile flash memory — SPI | Optical lens — PMMA | DC-DC step-down converter — USB output | DC-DC step-down converter — adjustable |
| Key Spec | 32Mbit / 64Mbit / 128Mbit options | 20mm diameter, 8°–120° beam angle | 6–32V input, 5V/9V/12V/24V output | 4–38V input, 1.25–36V output, 5A max |
| Interface / Protocol | SPI — BV and FV series compatible | For 1W, 3W, 5W LED chips | QC3.0 and QC2.0 fast charge protocols | Potentiometer voltage + current control |
| Key Feature | Non-volatile storage, fast R/W speeds | Precision beam shaping, superior light transmission | Multi-voltage auto-negotiation output | Built-in current limiting, up to 96% efficiency |
| Primary Application | Firmware storage, data logging, custom MCU projects | DIY LED spotlights, desk lamps, optical builds | Custom power banks, fast-charge stations | Variable bench supply, motor drivers, LED drivers |
| Rating | 4.8/5 | 4.7/5 | 4.7/5 | 4.8/5 |
Detailed Reviews: Top 4 Electronics Modules
W25Q32/W25Q64/W25Q128 SPI Flash Memory Module — Editor’s Choice
The W25Q series SPI Flash Memory Module earns our Editor’s Choice as the most broadly useful component in this comparison — the non-volatile memory solution that an enormous range of embedded and microcontroller projects require for stable, persistent storage. The essential function is straightforward: data written to SPI flash persists after power removal. This property is what enables firmware stored on a separate flash chip to survive power cycling, what makes data logging applications accumulate readings across sessions, and what allows custom bootloaders and configuration storage to maintain state independent of the microcontroller’s volatile RAM. Without non-volatile storage, every embedded project that needs to remember anything between power cycles requires either battery-backed SRAM or repeated reprogramming — both significantly more complex and expensive than a sub-dollar SPI flash module.
The W25Q32/W25Q64/W25Q128 series from Winbond is one of the most widely documented and supported SPI flash families in the hobbyist and professional embedded development ecosystem. Choosing a part with extensive community documentation means driver libraries, example code, and debugging resources are immediately available rather than requiring original development from a datasheet. The 32Mbit, 64Mbit, and 128Mbit capacity options cover project requirements from compact firmware storage through substantial data logging or asset storage applications. The BV and FV series compatibility — referring to 3.3V and 2.5V/1.8V operating voltage variants respectively — ensures these modules integrate with both standard 3.3V development boards and lower-voltage systems where supply compatibility matters.
The availability in 1, 5, and 10-piece pack options reflects how experienced makers actually purchase components — stocking multiples for ongoing project development rather than buying one at a time per project. At under $1 per module at single quantity, losing a chip during SMD rework or allocating modules to multiple concurrent projects is not a cost concern. The honest requirement is that these are surface-mount components that require soldering skill and appropriate tooling — they are not breadboard-friendly in their module form and benefit from proper SMD technique or a breakout board for prototyping use.
“Innovation in the DIY space thrives when creators have affordable access to the building blocks of tomorrow.”
Key Specifications
- Capacity Options: 32Mbit, 64Mbit, 128Mbit — from firmware storage through substantial data logging
- Interface: SPI — standard 4-wire protocol supported by virtually all modern microcontrollers
- Voltage: BV series (3.3V) and FV series (2.5V / 1.8V) — covers standard and low-voltage systems
- Pack Options: 1, 5, or 10 pieces — supports single-project and bulk component inventory purchasing
- Data Retention: Long-term non-volatile — data persists through power cycles without battery backup
- Requirement: SMD soldering skill — surface-mount package requires appropriate technique or breakout board
Best Use Cases
- External firmware storage for custom bootloaders and over-the-air update systems
- Sensor data logging applications where readings must persist through power cycling
- Configuration and calibration data storage for embedded instruments and control systems
- Audio and graphics asset storage for display and sound projects requiring non-volatile media
- Custom BIOS and firmware replacement in existing hardware modification projects
- Any microcontroller project where EEPROM capacity is insufficient for the required data storage
20mm PMMA LED Reflector Lens 8°–120° — Best LED Optic
The 20mm PMMA LED Reflector Lens earns the Best LED Optic position as the optical component that transforms a raw LED chip into a precision light source — the difference between a bare LED that emits light in a 120-degree hemisphere and a controlled beam that delivers that same light power into a specific angle determined by the application. Without optics, an LED spotlight is a diffuse emitter; with the correct lens, the same LED chip becomes a collimated beam with the intensity distribution required for a reading lamp, a stage spotlight, a sensor emitter, or any application where light direction and concentration matter. The lens is not an optional accessory for LED projects — it is the component that converts electrical power into useful directed light.
The 8° to 120° beam angle range covers the full practical spectrum of LED lighting applications from the narrowest spotlighting application through wide-area ambient illumination. The 8° option concentrates light into a tight beam appropriate for accent lighting, sensor emitters, and long-throw spotlights. Mid-range angles of 30°–60° suit general task lighting, desk lamps, and display illumination. The 120° option approaches a wide wash appropriate for area lighting and ambient applications. Selecting the correct beam angle for the application is the design decision that determines lighting performance — a 60° lens on a reading lamp produces a well-defined task light circle; the same LED with a 120° lens produces a softer ambient glow that does not concentrate adequately for focused task illumination.
The PMMA (polymethyl methacrylate) material is the optical-grade acrylic that provides the combination of high light transmission, UV stability, and surface smoothness that precision optics require. PMMA transmits approximately 92% of visible light — comparable to glass optics but at a fraction of the mass and cost. The material’s UV stability prevents the yellowing that degrades cheaper polycarbonate lenses over time under continuous LED exposure, maintaining optical clarity and beam geometry over years of operation. Precise alignment between the LED chip and the lens center is required to achieve the specified beam angle and uniformity — off-axis mounting shifts the beam and produces asymmetric illumination that no amount of power adjustment compensates for.
Key Specifications
- Diameter: 20mm — standard size compatible with common 1W, 3W, and 5W LED chip mounts
- Beam Angle: 8°–120° options — full range from narrow spotlight through wide ambient illumination
- Material: PMMA (optical acrylic) — ~92% visible light transmission, UV stable, scratch resistant
- LED Compatibility: 1W, 3W, and 5W LED chips — standard emitter package sizes
- Alignment: Precise LED-to-lens centering required for specified beam angle and uniformity
- Housing Note: 20mm diameter may not fit all compact enclosure designs — verify clearance before ordering
Best Use Cases
- DIY desk lamps and task lighting where beam angle selection determines the illuminated work area
- Custom spotlights and accent lighting using narrow 8°–15° angles for dramatic directed illumination
- LED sensor emitters in proximity and reflective sensing circuits requiring collimated output
- Photography and video lighting rigs using 3W and 5W LED chips with controlled beam angles
- Aquarium and plant grow lights requiring specific beam distribution over defined target areas
- Any LED project where raw chip emission is too diffuse for the intended illumination application
USB QC3.0/QC2.0 Step-Down Buck Converter — Best Fast Charger Module
The USB QC3.0/QC2.0 Step-Down Buck Converter earns the Best Fast Charger Module position as the component that adds commercial-grade fast charging protocol support to any custom power project. The distinction between a basic 5V USB charger and a QC3.0 charger is not merely a speed difference — it is a negotiated protocol difference that requires the charger hardware to implement the Qualcomm Quick Charge communication sequence that the connected device uses to request a higher voltage and current. A simple 5V source cannot provide QC charging regardless of its current capacity; the QC protocol must be implemented in hardware, and this module does that implementation in a compact $0.88 PCB that drops into any custom power bank or charging station design.
The 6V to 32V input range is the specification that makes this module genuinely versatile for diverse power sources — 12V lead-acid batteries, 3S–7S lithium packs, solar panels, and DC power supplies all fall within range. The automatic output voltage selection (5V, 9V, 12V, or 24V) reflects the QC protocol’s operation: when a QC-compatible device connects, it negotiates with the charger to select the highest voltage the device can accept for maximum charge current. The module handles this negotiation automatically — the output voltage adjusts to match the connected device’s request without user intervention. This automation is what makes the module plug-and-play in custom builds rather than requiring manual voltage configuration for each device type.
The built-in over-voltage and short-circuit protection provides the safety circuitry that makes this module appropriate for products intended to charge expensive devices. A charging circuit without protection that experiences a fault condition can damage the connected device — the protection circuitry in this module intervenes before fault currents reach the connected load. The compact PCB form factor fits easily into 3D-printed enclosures and existing housing cutouts where full-size charger assemblies would not. High-load operation generates heat that requires adequate ventilation in enclosed designs — leaving airflow clearance around the module or adding a small heatsink for sustained high-current sessions is the practical thermal management step that maximizes both module life and performance consistency.
Key Specifications
- Protocols: QC3.0 and QC2.0 — hardware implementation of Qualcomm fast charge negotiation
- Input Voltage: 6V – 32V DC — compatible with 12V lead-acid through multi-cell lithium packs
- Output Voltage: Auto-negotiated 5V, 9V, 12V, or 24V — adjusts to connected device request
- Protection: Over-voltage and short-circuit — prevents fault conditions reaching connected devices
- Form Factor: Compact PCB — fits 3D-printed enclosures and standard project boxes
- Thermal Note: Ventilation required at high load — allow airflow clearance in enclosed designs
Best Use Cases
- Custom power banks with QC fast charging output for compatible smartphones and tablets
- Solar and off-grid charging stations where input voltage varies and QC output is required
- Vehicle-mounted charging solutions powered from 12V or 24V automotive power systems
- Workshop charging station builds consolidating multiple device charging onto a single power supply
- Battery pack integration where QC protocol adds fast charge capability to custom lithium packs
- Any project bridging a DC power source and QC-capable devices that need protocol negotiation hardware
XL4015 DC-DC Buck Converter 5A 75W — Best Power Module
The XL4015 DC-DC Buck Converter earns the Best Power Module position as the most capable and versatile power management component in this comparison — a module that functions as a complete variable bench power supply front-end at a price that makes it a disposable component in complex multi-rail power projects. The combination of 5A current capability, 75W power handling, and the XL4015 chip’s up to 96% conversion efficiency puts this module in a performance category well above the typical cheap buck converter: at 96% efficiency, only 4% of input power becomes heat rather than useful output, which is the specification that determines both thermal management requirements and effective battery life in portable applications using this converter.
The 4V to 38V input range combined with 1.25V to 36V output range provides the broadest voltage coverage of any component in this guide — the module accepts everything from a single lithium cell through high-voltage lead-acid and multi-cell lithium stacks, and delivers from logic-level voltages through near-input voltages at the maximum current the source can provide up to 5A. The built-in current-limiting potentiometer is the feature that elevates this from a voltage converter to a complete power supply module: the ability to set a maximum current limit means the converter acts as a constant-current source when load demands exceed the set point, protecting both the converter and the connected load from fault current conditions during circuit testing and development.
The larger footprint compared to micro-converters reflects the thermal management requirements of the XL4015’s 5A capability — the inductor, capacitors, and heat dissipation area required for 75W operation necessarily occupy more board space than a 1A converter. For applications where 75W power handling is needed, the footprint is appropriate to the capability. Sustained high-load operation — particularly at the 5A maximum and elevated input voltages where power dissipation peaks — benefits from additional heatsinking on the XL4015 IC beyond the module’s standard copper pour thermal relief. The module’s potentiometers provide the precision voltage and current adjustment that makes it practical as both a fixed-output power module in completed designs and as a variable bench supply for circuit development and testing.
Key Specifications
- Input Voltage: 4V – 38V — single cells through high-voltage multi-cell packs and DC supplies
- Output Voltage: 1.25V – 36V adjustable via potentiometer — logic levels through high-voltage applications
- Max Current: 5A continuous — 75W power handling at appropriate input/output voltage combinations
- Efficiency: Up to 96% — minimal heat generation relative to output power
- Current Limiting: Potentiometer adjustable — constant-current mode for circuit protection during testing
- Thermal Note: Heatsinking recommended at maximum load — additional thermal relief for sustained 5A operation
Best Use Cases
- DIY variable bench power supply with both voltage and current control for circuit development
- High-current LED driver for powerful LED arrays and COB LED modules requiring stable constant-current supply
- Motor speed control and driver power supply for robotics and CNC applications
- Battery charging at controlled current for lead-acid maintenance charging and lithium pack top-up
- Multi-voltage power supply rails in complex projects requiring more than one output voltage from a single source
- Any application requiring 5A regulated power from a higher-voltage source with minimum thermal penalty
Electronics Modules Buying Guide 2026
Sourcing electronics modules effectively requires understanding which specifications determine real-world performance — and how to verify that a module’s claims are accurate before committing it to a design that depends on its behavior.
Verifying Specifications Before Integration
The most reliable verification practice for any module purchase is never integrating an untested module directly into a completed design. Test each new module in isolation before connecting it to sensitive downstream components. For power modules, verify the output voltage with a multimeter before connecting any load — a misconfigured potentiometer or a defective unit that outputs full input voltage rather than the set output can destroy the load instantly. For the XL4015 module specifically, set both voltage and current potentiometers to minimum before first power-on, then adjust upward to the target values under a simple resistive test load. This sequence ensures that the module performs as expected before any sensitive components are connected. For the SPI flash module, use a test sketch on a development board to verify read and write operations before integrating into a custom PCB layout.
Avoiding Common Sourcing Pitfalls
The four most common sourcing mistakes with electronics modules on AliExpress are ignoring voltage and current ratings, misidentifying the correct variant, purchasing from sellers without verified component history, and neglecting pinout verification against the datasheet before wiring. Voltage and current ratings that do not match the application cause either inadequate performance (undersized module) or component failure (oversized voltage to a sensitive load). Variant misidentification is common with the W25Q SPI flash series — the BV and FV series have different operating voltage requirements, and using a 3.3V-rated BV part in a 1.8V system or vice versa can damage the component or produce unreliable operation. Always download the specific datasheet for the exact part number received, even for well-known part families where documentation appears abundant — revision differences between package variants can affect pinout or electrical characteristics.
Essential Workbench Tools for Module Integration
Four tools are essential for working with the modules in this guide. A precision soldering iron with temperature control — set to 300–330°C for the SMD flash module, 350–380°C for larger power module connections — determines whether solder joints are clean and reliable or cold and resistive. A digital multimeter with voltage, current, and continuity measurement is the verification instrument for every power module setup and every completed circuit connection. A logic analyzer or oscilloscope is the debugging tool for SPI communication issues — seeing the actual clock, data, and chip-select signals eliminates the guesswork from SPI timing and configuration problems. A variable DC power supply with current limiting — which the XL4015 module itself can serve as — is the test power source that protects downstream components during initial power-on testing of any new circuit.
“The democratization of advanced hardware through global marketplaces is fundamentally changing how we approach engineering at home.”
Our Final Recommendations
The four modules in this guide address four distinct engineering requirements at a combined cost of $3.95 — a total that represents extraordinary functional capability per dollar. The W25Q SPI Flash Module at $0.99 provides the non-volatile storage foundation that any embedded project requiring persistent data needs. The PMMA LED Reflector Lens at $0.68 is the optical component that transforms raw LED chip output into a controlled, directional beam for every custom lighting application.
The QC3.0 Buck Converter at $0.88 adds commercial fast-charging protocol capability to any custom power design from a wide input voltage range. The XL4015 5A Buck Converter at $1.40 provides the highest performance power conversion in this comparison — 5A, 75W, up to 96% efficiency, and complete voltage and current control that makes it both a finished power module and a functional bench supply. Together these four modules cover memory, optics, fast charging, and high-current power regulation — the building blocks that enable a broad range of DIY electronics projects to reach professional-grade results.